Android Dynamic Include Custom Layout
Android Custom Layout 동적으로 추가하기
개발하며 가장 싫어하는 단어중의 하나는 ‘동적(Dynamic)’ 이다.ㅠㅠ
오늘은 Java 혹은 Kotlin을 이용해 커스텀 레이아웃을 동적으로 추가해보자!
동적으로 추가할 레이아웃 만들기 (XML)
1) activity_main.xml : 메인 화면
<?xml version="1.0" encoding="utf-8"?>
<LinearLayout xmlns:android="http://schemas.android.com/apk/res/android"
    xmlns:app="http://schemas.android.com/apk/res-auto"
    xmlns:tools="http://schemas.android.com/tools"
    android:layout_width="match_parent"
    android:layout_height="match_parent"
    android:orientation="vertical"
    tools:context=".MainActivity">

    <TextView
        android:layout_width="match_parent"
        android:layout_height="wrap_content"
        android:text="Dynamic Include Layout">
    </TextView>

    <LinearLayout
        android:id="@+id/ll_contain"
        android:layout_width="match_parent"
        android:layout_height="wrap_content"
        android:layout_marginTop="17dp"
        android:orientation="vertical">

        <!-- include layout_content.xml -->

    </LinearLayout>
</LinearLayout>
2) layout_content.xml : Custom으로 만든 레이아웃
<?xml version="1.0" encoding="utf-8"?>
<RelativeLayout xmlns:android="http://schemas.android.com/apk/res/android"
    android:layout_width="match_parent"
    android:layout_height="wrap_content"
    android:orientation="horizontal">

    <TextView
        android:id="@+id/tv_number"
        android:layout_width="24dp"
        android:layout_height="wrap_content"
        android:layout_alignParentStart="true"
        android:layout_alignParentTop="true"
        android:textColor="#ff0000"
        android:textSize="14dp"
        android:layout_alignParentLeft="true">
    </TextView>

    <TextView
        android:id="@+id/tv_text"
        android:layout_width="match_parent"
        android:layout_height="wrap_content"
        android:layout_marginTop="3dp"
        android:layout_toRightOf="@+id/tv_number"
        android:textColor="#0000ff"
        android:textSize="11dp">
    </TextView>
</RelativeLayout>
MainActivity에서 동적으로 레이아웃 추가하기
1) 동적으로 레이아웃을 추가하는 메서드
–> 아래 기능은 String 값 앞에 숫자가 있을 때, 숫자를 왼쪽 TextView에, 나머지 텍스트는 오른쪽 TextView에 set하는 기능
–> 각 레이아웃의 구분은 개행문자(\n)로 한다.
private fun setContent(layout: LinearLayout, content: String) {

    if (!TextUtils.isEmpty(content)) {
        val splitContent = content.split("\n".toRegex()).dropLastWhile { it.isEmpty() }.toTypedArray()
        val splitNumber = ArrayList<String>()
        val splitText = ArrayList<String>()

        // Content Text
        val mVContentView = arrayOfNulls<View>(splitContent.size)
        val mTvContentNumber = arrayOfNulls<TextView>(splitContent.size)
        val mTvContentText = arrayOfNulls<TextView>(splitContent.size)

        for (splitIdx in splitContent.indices) {
            if (TextUtils.isEmpty(splitContent[splitIdx])) {
                splitNumber.add("")
                splitText.add("")

            } else if (Pattern.matches("^[0-9]+$", splitContent[splitIdx].substring(0, 1))) {
                splitNumber.add(splitContent[splitIdx].substring(0, 2))
                splitText.add(splitContent[splitIdx].substring(2).trim { it <= ' ' })

            } else {
                splitNumber.add("")
                splitText.add(splitContent[splitIdx])

            }
        }

        layout.removeAllViews()

        for (layoutIdx in splitContent.indices) {
            val layoutInflater = this.getSystemService(Context.LAYOUT_INFLATER_SERVICE) as LayoutInflater
            val containView = layoutInflater.inflate(R.layout.layout_content, null)
            layout.addView(containView)

            mVContentView[layoutIdx] = containView as View

            mTvContentNumber[layoutIdx] = mVContentView[layoutIdx]!!.findViewById(R.id.tv_number) as TextView
            mTvContentText[layoutIdx] = mVContentView[layoutIdx]!!.findViewById(R.id.tv_text) as TextView

            mTvContentNumber[layoutIdx]!!.setText(splitNumber[layoutIdx])
            mTvContentText[layoutIdx]!!.setText(splitText[layoutIdx])

            if (TextUtils.isEmpty(splitNumber[layoutIdx])) {
            mTvContentNumber[layoutIdx]!!.setVisibility(View.GONE)
            }
        }

    } else {
        // TODO: get your code!
        Log.e("ERROR!", "Content is empty!");
    }
}
2) 아래와 같이 사용
setContent(ll_contain, DummyData.sDummyData);
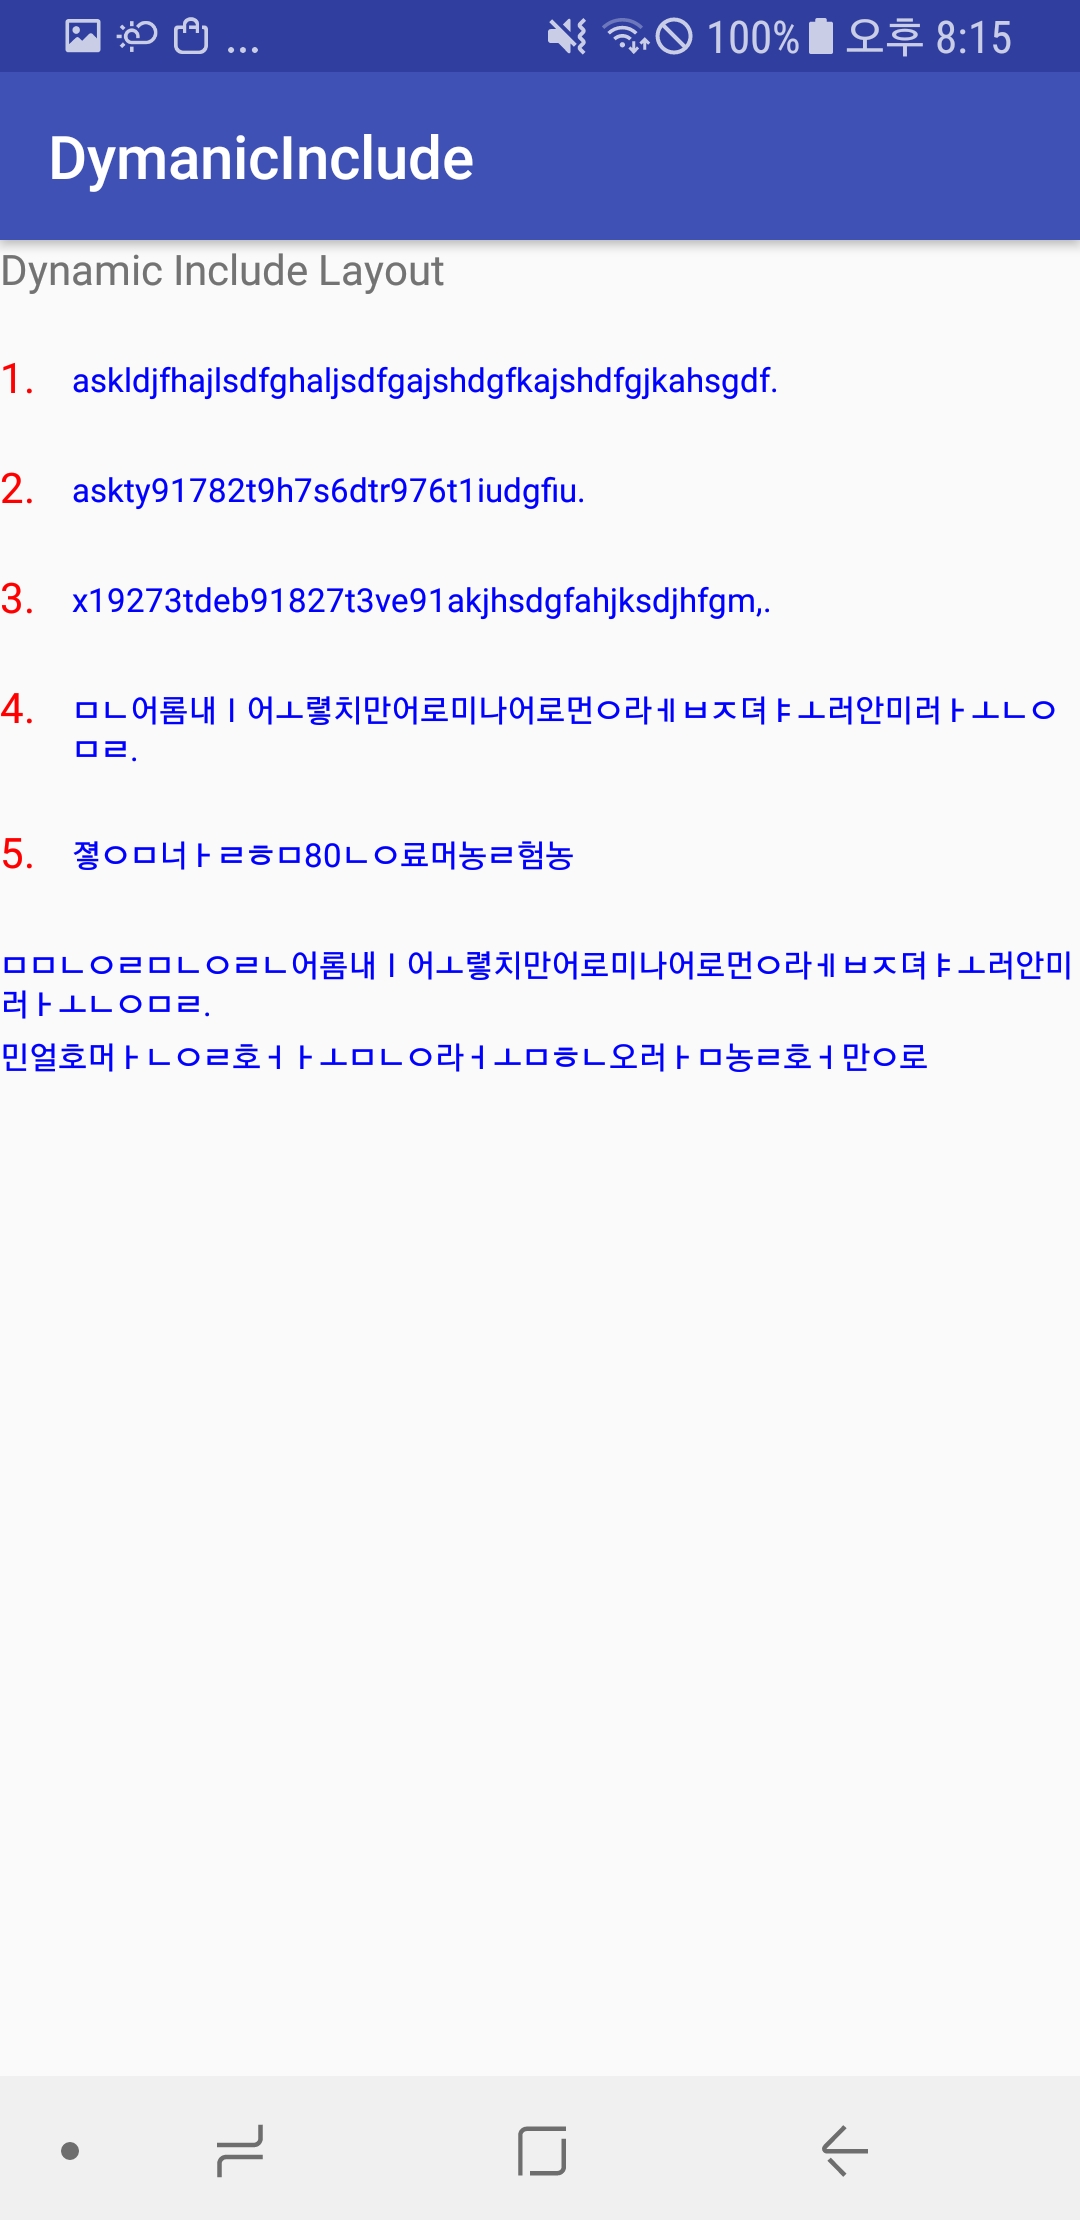
3) 아래와 같은 더미데이터를 넣었을 때 나오는 화면!
public static String sDummyData =
    "1. askldjfhajlsdfghaljsdfgajshdgfkajshdfgjkahsgdf.\n\n" +
    "2. askty91782t9h7s6dtr976t1iudgfiu.\n\n" +
    "3. x19273tdeb91827t3ve91akjhsdgfahjksdjhfgm,.\n\n" +
    "4. ㅁㄴ어롬내ㅣ어ㅗ렿치만어로미나어로먼ㅇ라ㅔㅂㅈ뎌ㅑㅗ러안미러ㅏㅗㄴㅇㅁㄹ.\n\n" +
    "5. 졓ㅇㅁ너ㅏㄹㅎㅁ80ㄴㅇ료머농ㄹ험농\n\n" +
    "ㅁㅁㄴㅇㄹㅁㄴㅇㄹㄴ어롬내ㅣ어ㅗ렿치만어로미나어로먼ㅇ라ㅔㅂㅈ뎌ㅑㅗ러안미러ㅏㅗㄴㅇㅁㄹ.\n" +
    "민얼호머ㅏㄴㅇㄹ호ㅓㅏㅗㅁㄴㅇ라ㅓㅗㅁㅎㄴ오러ㅏㅁ농ㄹ호ㅓ만ㅇ로";
 (디자인 까다로울 때 써야겠다,,,,,,)
끝!
소스코드 :
https://github.com/CaptainWonJong/DynamicInclude